They said it couldn't be done! Well, technically it couldn't because no script could ever play nicely with AC. But now Unity has an integrated Pixel-perfect script that renders to a texture internally, we can! Here's how YOU can make the jump from those older, clunkier, but pixel-perfect adventure creating tools to a modern, sleek but inherently responsively designed development tool, in just a few dozen easy steps!
1. Upgrade to Unity 2018.2 or greater

2. Goto Window > Package Manager and download 2D Pixel Perfect.

.png)
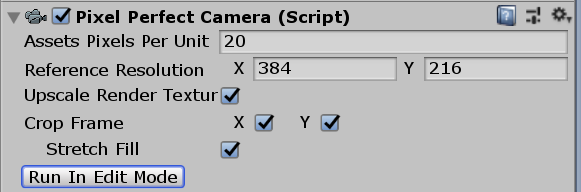
3. Add Pixel Perfect Camera script AC's to MainCamera.
4. After importing your textures into the project as Sprites, set all Sprites to the same Pixels Per Unit value (you can use Unity 2018's Presets for this).
I use 20 PPU since it makes sure a Lucasarts sized character is roughly the same height as Brain2D (the custodian of all Unity character sizes and as such his dimensions should be closely observed!)
I also use 384x216 as the reference resolution so the pixel size on screen is very similar to the older games when stretched to 1920x1080, but you can use 320x180 if you want pixel-perfectness for even more integer resolutions between 1920x1080.
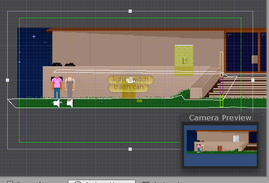
If your camera appears with a larger size than the reference resolution (green line is smaller than white line):

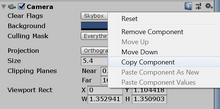
Make sure you resize the camera size to the same size as Pixel Perfect camera script will set it to during the game. To do this permanently, click "Run In Edit Mode":

on PPC and copy the new camera component settings, click "Run In Edit Mode" and, then paste them back into all of your game cameras and the MainCamera as values.

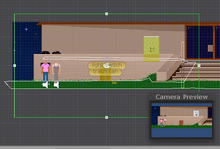
This is MASSIVELY important if you want to use UI's in camera space, or you have any UI issues where the canvas scaler isn't fitting the screen properly.
So now it should look like this:

Notice I also used stretch fill? That will look ugly and blurry by default. But fear not, we can hack!


Double-click PixelPerfectCamera (with the camera icon) to edit the script in VS and find this line at 187:


RenderTexture activeRT = m_Camera.activeTexture;
if (activeRT != null)
activeRT.filterMode = m_Internal.useStretchFill ? FilterMode.Bilinear : FilterMode.Point;
and change it to
RenderTexture activeRT = m_Camera.activeTexture;
if (activeRT != null)
activeRT.filterMode = m_Internal.useStretchFill ? FilterMode.Point: FilterMode.Point;


This ensures that you'll have sharp pixels, even if stretch fill is used. This means that non integer sizes may be a bit pickled, but it's better than using bilinear (actually, if the RT upscaled to the closest smaller integer, THEN applied bilinear before upscaling to the final resolution, that would be better, but we can't have everything, can we? :p)
5. If you need to import any more textures into the project as Sprites, set all Sprites to the same Pixels Per Unit value (you should be using Presets to do this).


.png)
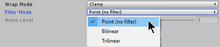
6. In the Sprites' Inspector window, set their Filter Mode to Point.

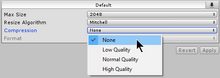
7. Set their Compression to 'None'.

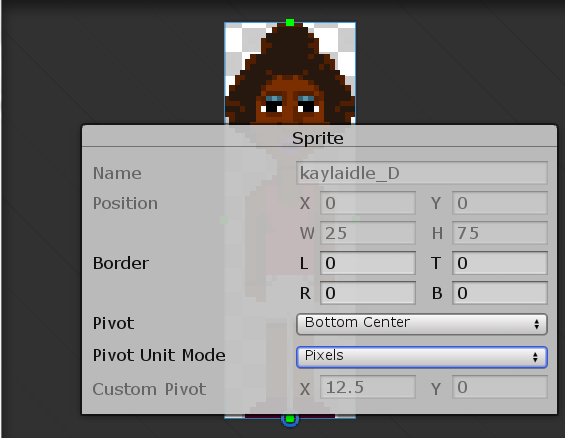
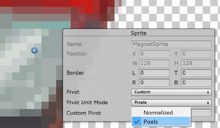
8. Set their pivot point to pixels.
.png)
8. Follow the steps below to correctly set the pivot for a Sprite
- Open the Sprite Editor for the selected Sprite.
- If Sprite Mode is set to Multiple and there are multiple Sprite elements, then a pivot point must be set for each individual Sprite element.
- Under the Sprite settings, select Custom from the Pivot drop-down menu. Then select Pixels from the Pivot Unit Mode drop-down menu. This allows you to input the pivot point's coordinatess in pixels, or drag the pivot point around freely in the Sprite Editor and have it automatically snap to pixel corners.
- Repeat step 4(3) for each Sprite element as needed.

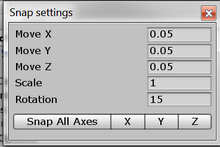
To ensure the pixelated movement of Sprites are consistent with each other, follow the below steps to set the proper snap settings for your project.
- Open the Snap Settings at menu: Edit > Snap Settings...
- For Move X/Y/Z, set their values to '1 divided by the Asset Pixels Per Unit (PPU) value'
- Snap settings are not applied retroactively. If there are any pre-existing GameObjects in the Scene, select each of them and click Snap All Axes to apply the Snap settings.
These are my settings for PPU of 20:

If you are using ProGrids (highly recommended!!) it will follow Unity's snap settings by default (check the preferences if it isn't)
And that should be it! Read the manual for further instructions:
NEW! Pixel-perfect UI!
Want your UI to be pixel-perfect too? Heh, let's see:


Set your canvas scaler (on your root gameobject for your UI) to Screen Space - Camera.
Then, add this script to the root gameobject for your UI:
https://github.com/elvisish/pixel-perfect/blob/master/MainCamCopyInto.cs
This will force the UI to use MainCamera at runtime, and it needs this script otherwise Unity will default it back to overlay. You can't set the camera in the Canvas component to MainCamera either, as it will forget it at runtime (this should have been fixed in AC 1.65, but I haven't tried without this script).
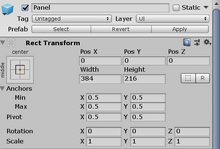
You may need to add an intermediate panel the size of your reference resolution to ensure positioning still works:


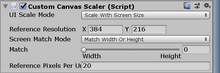
Also, instead of using Canvas Scaler, replace it with Custom Canvas Scaler included with the Pixel Perfect camera package on GitHub under Xtras:

Set match to "Height" so that in window mode, if the window is scaled it will move and scale exactly with everything else.
This will keep your UI matched to the same size as the rest of the game.